5 Steps From Picture To Quilt
Estimated Read Time 7 Minutes
It happens all the time. We see a quilt and love it so much we want to make it. There is no information at all about a pattern or designer. This tutorial walks you through the 5 step process to create your own pattern to piece a similar or identical quilt.
- Step 1: Find the block.
- Step 2: Find the grid.
- Step 3: Choose block size and list units in block.
- Step 4: Design your quilt using our quilt calculator.
- Step 5: Find fabric requrements and cutting instructions for the blocks.
I know what your thinking. "This is to HARD." Did I tell you there's hardley no math involved and most people can go through these steps in well under an hour?
Confused already? Watch this short video about patches, units, grids and blocks.
Step 1: Find the Block
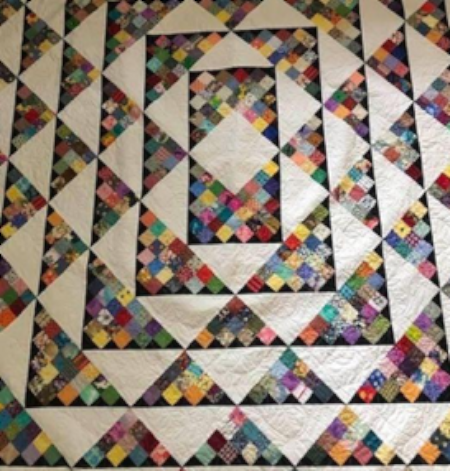
Look for familiar shapes or where the blocks are sewn together. Look for shapes or units that repeat. In the picture below, I marked the seamlines of where the blocks are sewn together and where I think the block is.
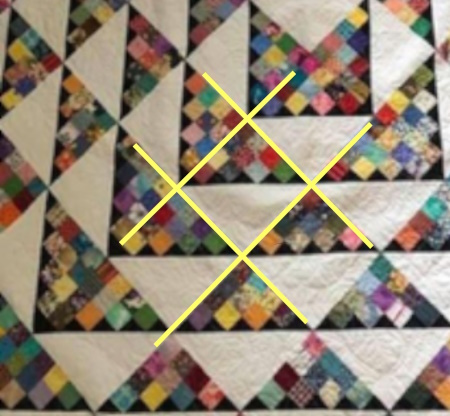
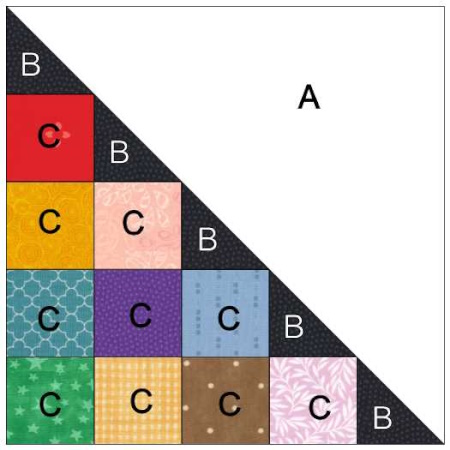
We can see this block is a half square triangle (HST). The light side is a HST patch and the dark side is pieced using squares and HST patches. Additionally, I see the blocks are set on point. Step 1 is complete.
Step 2: Find the Grid
Next I have labeled the grid spaces along one side as 1 thru 5. Spaces 1 thru 4 are squares and space 5 is a HST unit. The HST unit has a dark side that is a small HST patch. The light side is part of the large HST patch. The squares and small HST patches all finish at the same size.
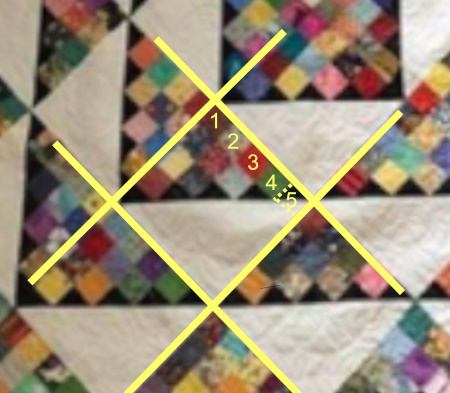
Looking at the adjacent pieced side of the block, you see the same pattern of 4 squares and 1 HST. This is a 5 x 5 grid and all spaces in the grid finish at the same size.
Step 3: Choose Block Size and List Units in Block
Choose Block Size
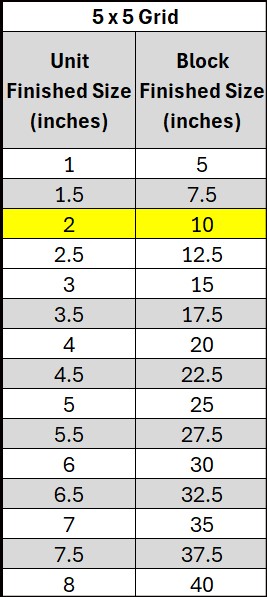
Refer to the 5x5 Grid chart and choose a block size that works for you based on either Unit Finished Size or Block Finished Size.
Unit Size - how easy is it to cut and piece each unit in that size? In our example there are lots of small squares. Think Jelly Roll scraps. Cut 2-1/2" strips into squares, that makes 2" finished squares.
The 2" finished unit is highlighted in yellow on the chart. If all the units in the grid are 2" finished, my finished block is 10".
Block Size - What if I wanted a 12" finished block? In the chart, look at the right side column for the 12" finished block. There isn't one!
To make a 12" finished block based on a 5x5 grid, divide 12" by 5 units. This gives you a finished unit size of 2.4". I don't even want to try to do the math for that! The nearest size to a 12" block is the 12.5" block made with 2.5" finished units.
Download the FREE pdf file ->>Quilt Block Grid Charts
List Units in Block
Block Diagram
10" Finished Block - 2" Finished Units
Block drawn using EQ8 ->> ElectricQuilt.com
It's a good idea to draw the quilt block at this time. I use Electric Quilt 8 but graph paper works just as well.
Download free graph paper designed for quilters ->> Quilter's Graph Paper
Next we list the type and number of units used in the block. We use this information in Step 5 to determine fabric requirments and cutting instructions using the calculators.
- Patch A - 10" finished HST patch - 1
- Patch B - 2" finished HST patch - 5
- Patch C - 2" finished square - 10
Step 4: Design Your Quilt Using The Quilt Layout Calculator
In this example we use the Straight Set Calculator (link below). Enter the following numbers in the calculator:
- Block Width and Block Height = 10
- If you don't want sashing or borders, click the down arrow on each until "0" is shown. If you do want sashing or up to 5 borders, enter the finished size for each instead.
- Change the values in the Blocks Across and Blocks Down until "Quilt Size" shows the size you want.
- When you are happy with your design, click the "SUBMIT" button on that page. A new page with your results is displayed. Right click and choose "Print" to print the page.
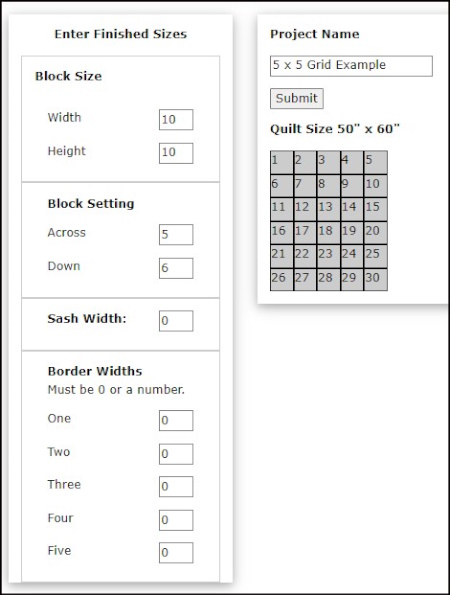
This image shows the input for a Quilt Size 50" x 60" with no borders or sashing.
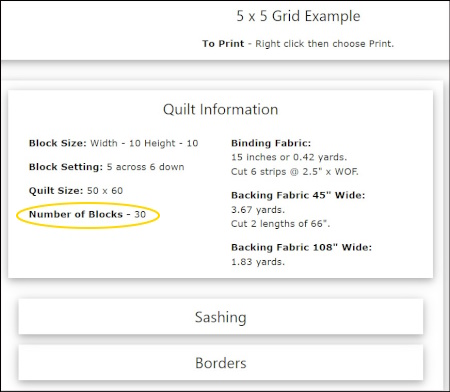
Results of Straight Set Calculator with Number of Blocks circled.
Click this button to open the calculator in a new window.
Step 5: Fabric Requirements and Cutting Instructions For All Blocks
Now that we know the unit finished size is 2" and the number of blocks we need is 30, we can find the fabric requirements and cutting instructions for each unit.
From Step 3 we know the type and number of units used in the block. Multiply these numbers by the Number of blocks. In our example we multiply by 30.
TIP: Use the print out from Step 4 to jot down these numbers.
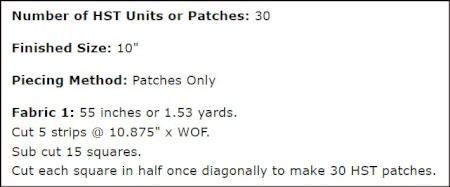
Patch A - 10" finished HST patch - 1 per block. 1 x 30 = 30
Patch B - 2" finished HST patch - 5 per block. 5 x 30 = 150
Patch C - 2" finished square - 10 per block. 10 x 30 = 300
Rotary Cutting
Patch A - Light Fabric
Click the BLOCKS tab above then chose the Half Square Triangles Calculator:
- In Number of HST Units or Patches Needed - Enter 30
- In HST finished size - Enter 10
- In Piecing method - Choose Patches Only
Click the Calculate button and the results appear.
Right click and choose Print to print results.
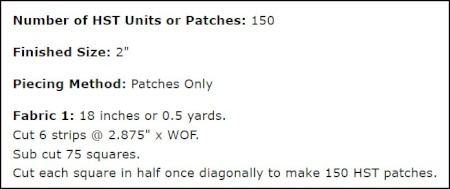
Patch B - Dark Fabric
Click the BLOCKS tab above then chose the Half Square Triangles Calculator:
- In Number of HST Units or Patches Needed - Enter 150
- In HST finished size - Enter 2
- In Piecing method - Choose Patches Only
Click the Calculate button and the results appear.
Right click and choose Print to print results.
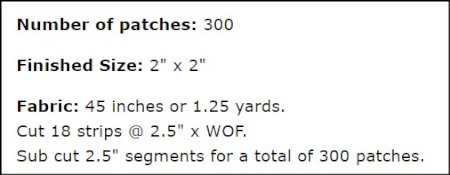
Patch B - Dark Fabric
Click the BLOCKS tab above then chose the Square and Rectangle Patches calculator:
- In Number of Patches - Enter 300
- In Finished Width - Enter 2
- In Finished Length - Enter 2
Click the Calculate button and the results appear.
Right click and choose Print to print results.
AccuQuilt Cutting
For AccuQuilt cutting:
- Click the ACCUQUILT tab above.
- In the Search By Shape And Finished Size section choose the shape and finished size of the unit you need.
- Click Search.
- Choose the die you are using to cut that unit.
Patch A - 10" Finished HST Patch - Light Fabric
There is no die that will cut a 10" finished HST. Use Rotary Cutting.
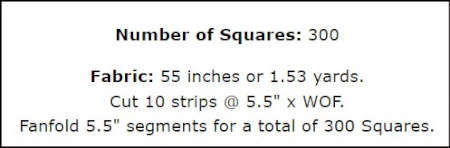
Patch B - 2" Finished HST Patch - Dark Fabric
- In Number of HST - Enter 150
- Click the Calculate button and the results appear.
- Use fabric requirements for Dark Fabric.
- Right click and choose Print to print results.

Your results are based on the die you choose.
Patch B - 2" Finished Squares - Dark Fabric
- In Number of Squares - Enter 300
- Click the Calculate button and the results appear.
- Right click and choose Print to print results.
Your results are based on the die you choose.
Summary
If you have gone throuh all 5 steps, you should have the following printed pages:
- From Step 4 - A page showing information about the quilt along with fabric requirements and cutting instructions for backing, binding and any sashing, cornerstones or borders you added.
- From Step 5 - A page for each of the 3 units used in the block. Each page will have fabric requirements and cutting instructions for that unit.
All that's left to do now is gather your fabric and start cutting and piecing your next project!
Happy quilting!
Carol